Server API#
CLIP-as-service is designed in a client-server architecture. A server is a long-running program that receives raw sentences and images from clients, and returns CLIP embeddings to the client. Additionally, clip_server is optimized for speed, low memory footprint and scalability.
Horizontal scaling: adding more replicas easily with one argument.
Vertical scaling: using PyTorch JIT, ONNX or TensorRT runtime to speedup single GPU inference.
Supporting gRPC, HTTP, Websocket protocols with their TLS counterparts, w/o compressions.
This chapter introduces the API of the server.
Tip
You will need to install server first in Python 3.7+: pip install clip-server.
Start server#
Start a PyTorch-backed server#
Unlike the client, server only has a CLI entrypoint. To start a server, run the following in the terminal:
python -m clip_server
Note that it is underscore _ not the dash -.
First time running will download the pretrained model (Pytorch ViT-B/32 by default), load the model, and finally you will get the address information of the server. This information will then be used in clients.
Start a ONNX-backed server#
To use ONNX runtime for CLIP, you can run:
pip install "clip_server[onnx]"

python -m clip_server onnx-flow.yml
Start a TensorRT-backed server#
nvidia-pyindex package needs to be installed first. It allows your pip to fetch additional Python modules from the NVIDIA NGC™ PyPI repo:
pip install nvidia-pyindex
pip install "clip_server[tensorrt]"

python -m clip_server tensorrt-flow.yml
One may wonder where is this onnx-flow.yml or tensorrt-flow.yml come from. Must be a typo? Believe me, just run it. It should just work. I will explain this YAML file in the next section.
The procedure and UI of ONNX and TensorRT runtime would look the same as Pytorch runtime.
Model support#
The various CLIP models implemented in the OpenAI, OpenCLIP, and MultilingualCLIP are supported.
ViT-B-32::openai is used as the default model in all runtimes.
Due to the limitation of some runtimes, not every runtime supports all models.
Please also note that different models give different sizes of output dimensions. This will affect your downstream applications. For example, switching the model from one to another make your embedding incomparable, which breaks the downstream applications. Below is a list of supported models of each runtime and its corresponding size.
For more details about the models and how to select the best model for your application, please refer to the CLIP benchmark page.
Model |
PyTorch |
ONNX |
TensorRT |
Output Dimension |
|---|---|---|---|---|
RN50::openai |
✅ |
✅ |
✅ |
1024 |
RN50::yfcc15m |
✅ |
✅ |
✅ |
1024 |
RN50::cc12m |
✅ |
✅ |
✅ |
1024 |
RN101::openai |
✅ |
✅ |
✅ |
512 |
RN101::yfcc15m |
✅ |
✅ |
✅ |
512 |
RN50x4::openai |
✅ |
✅ |
✅ |
640 |
RN50x16::openai |
✅ |
✅ |
❌ |
768 |
RN50x64::openai |
✅ |
✅ |
❌ |
1024 |
ViT-B-32::openai |
✅ |
✅ |
✅ |
512 |
ViT-B-32::laion2b_e16 |
✅ |
✅ |
✅ |
512 |
ViT-B-32::laion400m_e31 |
✅ |
✅ |
✅ |
512 |
ViT-B-32::laion400m_e32 |
✅ |
✅ |
✅ |
512 |
ViT-B-32::laion2b-s34b-b79k |
✅ |
✅ |
❌ |
512 |
ViT-B-16::openai |
✅ |
✅ |
✅ |
512 |
ViT-B-16::laion400m_e31 |
✅ |
✅ |
✅ |
512 |
ViT-B-16::laion400m_e32 |
✅ |
✅ |
✅ |
512 |
ViT-B-16-plus-240::laion400m_e31 |
✅ |
✅ |
🚧 |
640 |
ViT-B-16-plus-240::laion400m_e32 |
✅ |
✅ |
🚧 |
640 |
ViT-L-14::openai |
✅ |
✅ |
❌ |
768 |
ViT-L-14::laion400m_e31 |
✅ |
✅ |
❌ |
768 |
ViT-L-14::laion400m_e32 |
✅ |
✅ |
❌ |
768 |
ViT-L-14::laion2b-s32b-b82k |
✅ |
✅ |
❌ |
768 |
ViT-L-14-336::openai |
✅ |
✅ |
❌ |
768 |
ViT-H-14::laion2b-s32b-b79k |
✅ |
✅ |
❌ |
1024 |
ViT-g-14::laion2b-s12b-b42k |
✅ |
✅ |
❌ |
1024 |
M-CLIP/LABSE-Vit-L-14 |
✅ |
✅ |
❌ |
768 |
M-CLIP/XLM-Roberta-Large-Vit-B-32 |
✅ |
✅ |
🚧 |
512 |
M-CLIP/XLM-Roberta-Large-Vit-B-16Plus |
✅ |
✅ |
🚧 |
640 |
M-CLIP/XLM-Roberta-Large-Vit-L-14 |
✅ |
✅ |
❌ |
768 |
✅ = Supported — 🚧 = Working in progress — ❌ = Not supported
Use custom model for onnx#
You can also use your own model in ONNX runtime by specifying the model name and the path to ONNX model directory in YAML file. The model directory should have the same structure as below:
.
└── custom-model/
    ├── textual.onnx
    └── visual.onnx
One may wonder how to produce the model as described above. Fortunately, you can simply use the Finetuner to fine-tune your model based on custom dataset. Finetuner is a cloud service that makes fine-tuning simple and fast. Moving the process into the cloud, Finetuner handles all related complexity and infrastructure, making models performant and production ready. Click here for detail instructions.
YAML config#
You may notice that there is a YAML file in our last ONNX example. All configurations are stored in this file. In fact, python -m clip_server does not support any other argument besides a YAML file. So it is the only source of the truth of your configs.
To load a YAML config from my.yml, simply do
python -m clip_server my.yml
Or one can also pipe the config via stdin:
cat my.yml | python -m clip_server -i
This can be very useful when using clip_server in a Docker container.
And to answer your doubt, clip_server has three built-in YAML configs as a part of the package resources. When you do python -m clip_server it loads the Pytorch config, and when you do python -m clip_server onnx-flow.yml it loads the ONNX config.
In the same way, when you do python -m clip_server tensorrt-flow.yml it loads the TensorRT config.
Let’s look at these three built-in YAML configs:
jtype: Flow
version: '1'
with:
  port: 51000
executors:
  - name: clip_t
    uses:
      jtype: CLIPEncoder
      metas:
        py_modules:
          - clip_server.executors.clip_torch
jtype: Flow
version: '1'
with:
  port: 51000
executors:
  - name: clip_o
    uses:
      jtype: CLIPEncoder
      metas:
        py_modules:
          - clip_server.executors.clip_onnx
jtype: Flow
version: '1'
with:
  port: 51000
executors:
  - name: clip_r
    uses:
      jtype: CLIPEncoder
      metas:
        py_modules:
          - clip_server.executors.clip_tensorrt
Basically, each YAML file defines a Jina Flow. The complete Jina Flow YAML syntax can be found here. General parameters of the Flow and Executor can be used here as well. But now we only highlight the most important parameters.
Looking at the YAML file again, we can put it into three subsections as below:
jtype: Flow
version: '1'
with:
  port: 51000
executors:
  - name: clip_t
    uses:
      jtype: CLIPEncoder
      with:
      metas:
        py_modules:
          - clip_server.executors.clip_torch
jtype: Flow
version: '1'
with:
  port: 51000
executors:
  - name: clip_t
    uses:
      jtype: CLIPEncoder
      with:
      metas:
        py_modules:
          - clip_server.executors.clip_torch
jtype: Flow
version: '1'
with:
  port: 51000
executors:
  - name: clip_t
    uses:
      jtype: CLIPEncoder
      with:
      metas:
        py_modules:
          - clip_server.executors.clip_torch
CLIP model config#
For all backends, you can set the following parameters via with:
Parameter |
Description |
|---|---|
|
The name of the model to be used. Default ‘ViT-B-32::openai’. A list of available models can be found here |
|
The number of CPU workers to preprocess images and texts. Default is 4. |
|
The size of the minibatch for preprocessing and encoding. Default is 32. Reduce this number if you encounter OOM errors. |
There are also runtime-specific parameters listed below:
Parameter |
Description |
|---|---|
|
‘cpu’ or ‘cuda’. Default is None, which auto-detects the device. |
|
Whether to use JIT compilation. Default is False. |
Parameter |
Description |
|---|---|
|
‘cpu’ or ‘cuda’. Default is None, which auto-detects the device. |
|
The path to the model to be used. If not specified, the model will be downloaded or loaded from the local cache. See here to learn how to finetune custom models. |
For example, to turn on JIT and force PyTorch running on CPU, one can do:
jtype: Flow
version: '1'
with:
  port: 51000
executors:
  - name: clip_t
    uses:
      jtype: CLIPEncoder
      with:
        jit: True
        device: cpu
      metas:
        py_modules:
          - clip_server.executors.clip_torch
To use custom model in ONNX runtime, one can do:
jtype: Flow
version: '1'
with:
  port: 51000
executors:
  - name: clip_o
    uses:
      jtype: CLIPEncoder
      with:
        name: ViT-B/32
        model_path: 'custom-model'
      metas:
        py_modules:
          - clip_server.executors.clip_onnx
Warning
The model name should match the fine-tuned model, or you will get incorrect output.
Executor config#
The full list of configs for Executor can be found via jina executor --help. The most important one is probably replicas, which allows you to run multiple CLIP models in parallel to achieve horizontal scaling.
To scale to 4 CLIP replicas, simply adding replicas: 4 under uses::
jtype: Flow
version: '1'
with:
  port: 51000
executors:
  - name: clip_t
    replicas: 4
    uses:
      jtype: CLIPEncoder
      metas:
        py_modules:
          - clip_server.executors.clip_torch
Flow config#
Flow configs are the ones under top-level with:. We can see the port: 51000 is configured there. Besides port, there are some common parameters you might need.
Parameter |
Description |
|---|---|
|
Communication protocol between server and client. Can be |
|
Only effective when |
|
Control the maximum streamed request inside the Flow at any given time, default is |
As an example, to set protocol and prefetch, one can modify the YAML as follows:
jtype: Flow
version: '1'
with:
  port: 51000
  protocol: websocket
  prefetch: 10
executors:
  - name: clip_t
    replicas: 4
    uses:
      jtype: CLIPEncoder
      metas:
        py_modules:
          - clip_server.executors.clip_torch
Environment variables#
To start a server with more verbose logging,
JINA_LOG_LEVEL=DEBUG python -m clip_server

To run CLIP-server on 3rd GPU,
CUDA_VISIBLE_DEVICES=2 python -m clip_server
Serve on Multiple GPUs#
If you have multiple GPU devices, you can leverage them via CUDA_VISIBLE_DEVICES=RR. For example, if you have 3 GPUs and your Flow YAML says replicas: 5, then
CUDA_VISIBLE_DEVICES=RR python -m clip_server
Will assign GPU devices to the following round-robin fashion:
GPU device |
Replica ID |
|---|---|
0 |
0 |
1 |
1 |
2 |
2 |
0 |
3 |
1 |
4 |
You can also restrict the visible devices in round-robin assigment by CUDA_VISIBLE_DEVICES=RR0:2, where 0:2 has the same meaning as Python slice. This will create the following assigment:
GPU device |
Replica ID |
|---|---|
0 |
0 |
1 |
1 |
0 |
2 |
1 |
3 |
0 |
4 |
Tip
In pratice, we found it is unnecessary to run clip_server on multiple GPUs for two reasons:
A single replica even with largest
ViT-L/14-336pxtakes only 3.5GB VRAM.Real network traffic never utilizes GPU in 100%.
Based on these two points, it makes more sense to have multiple replicas on a single GPU comparing to have multiple replicas on different GPU, which is kind of waste of resources. clip_server scales pretty well by interleaving the GPU time with mulitple replicas.
Monitor with Prometheus and Grafana#
To monitor the performance of the service, you can enable the Prometheus metrics in the Flow YAML:
jtype: Flow
version: '1'
with:
  port: 51000
  monitoring: True
  port_monitoring: 9090
executors:
  - name: clip_t
    uses:
      jtype: CLIPEncoder
      metas:
        py_modules:
          - clip_server.executors.clip_torch
    monitoring: true
    port_monitoring: 9091
This enables Prometheus metrics on both Gateway and the CLIP Executor.
Running it gives you:

which exposes two additional endpoints:
http://localhost:9090for the Gatewayhttp://localhost:9091for the CLIP Executor
To visualize the metrics in Grafana, you can import this JSON file of an example dashboard. You will get something as follows:
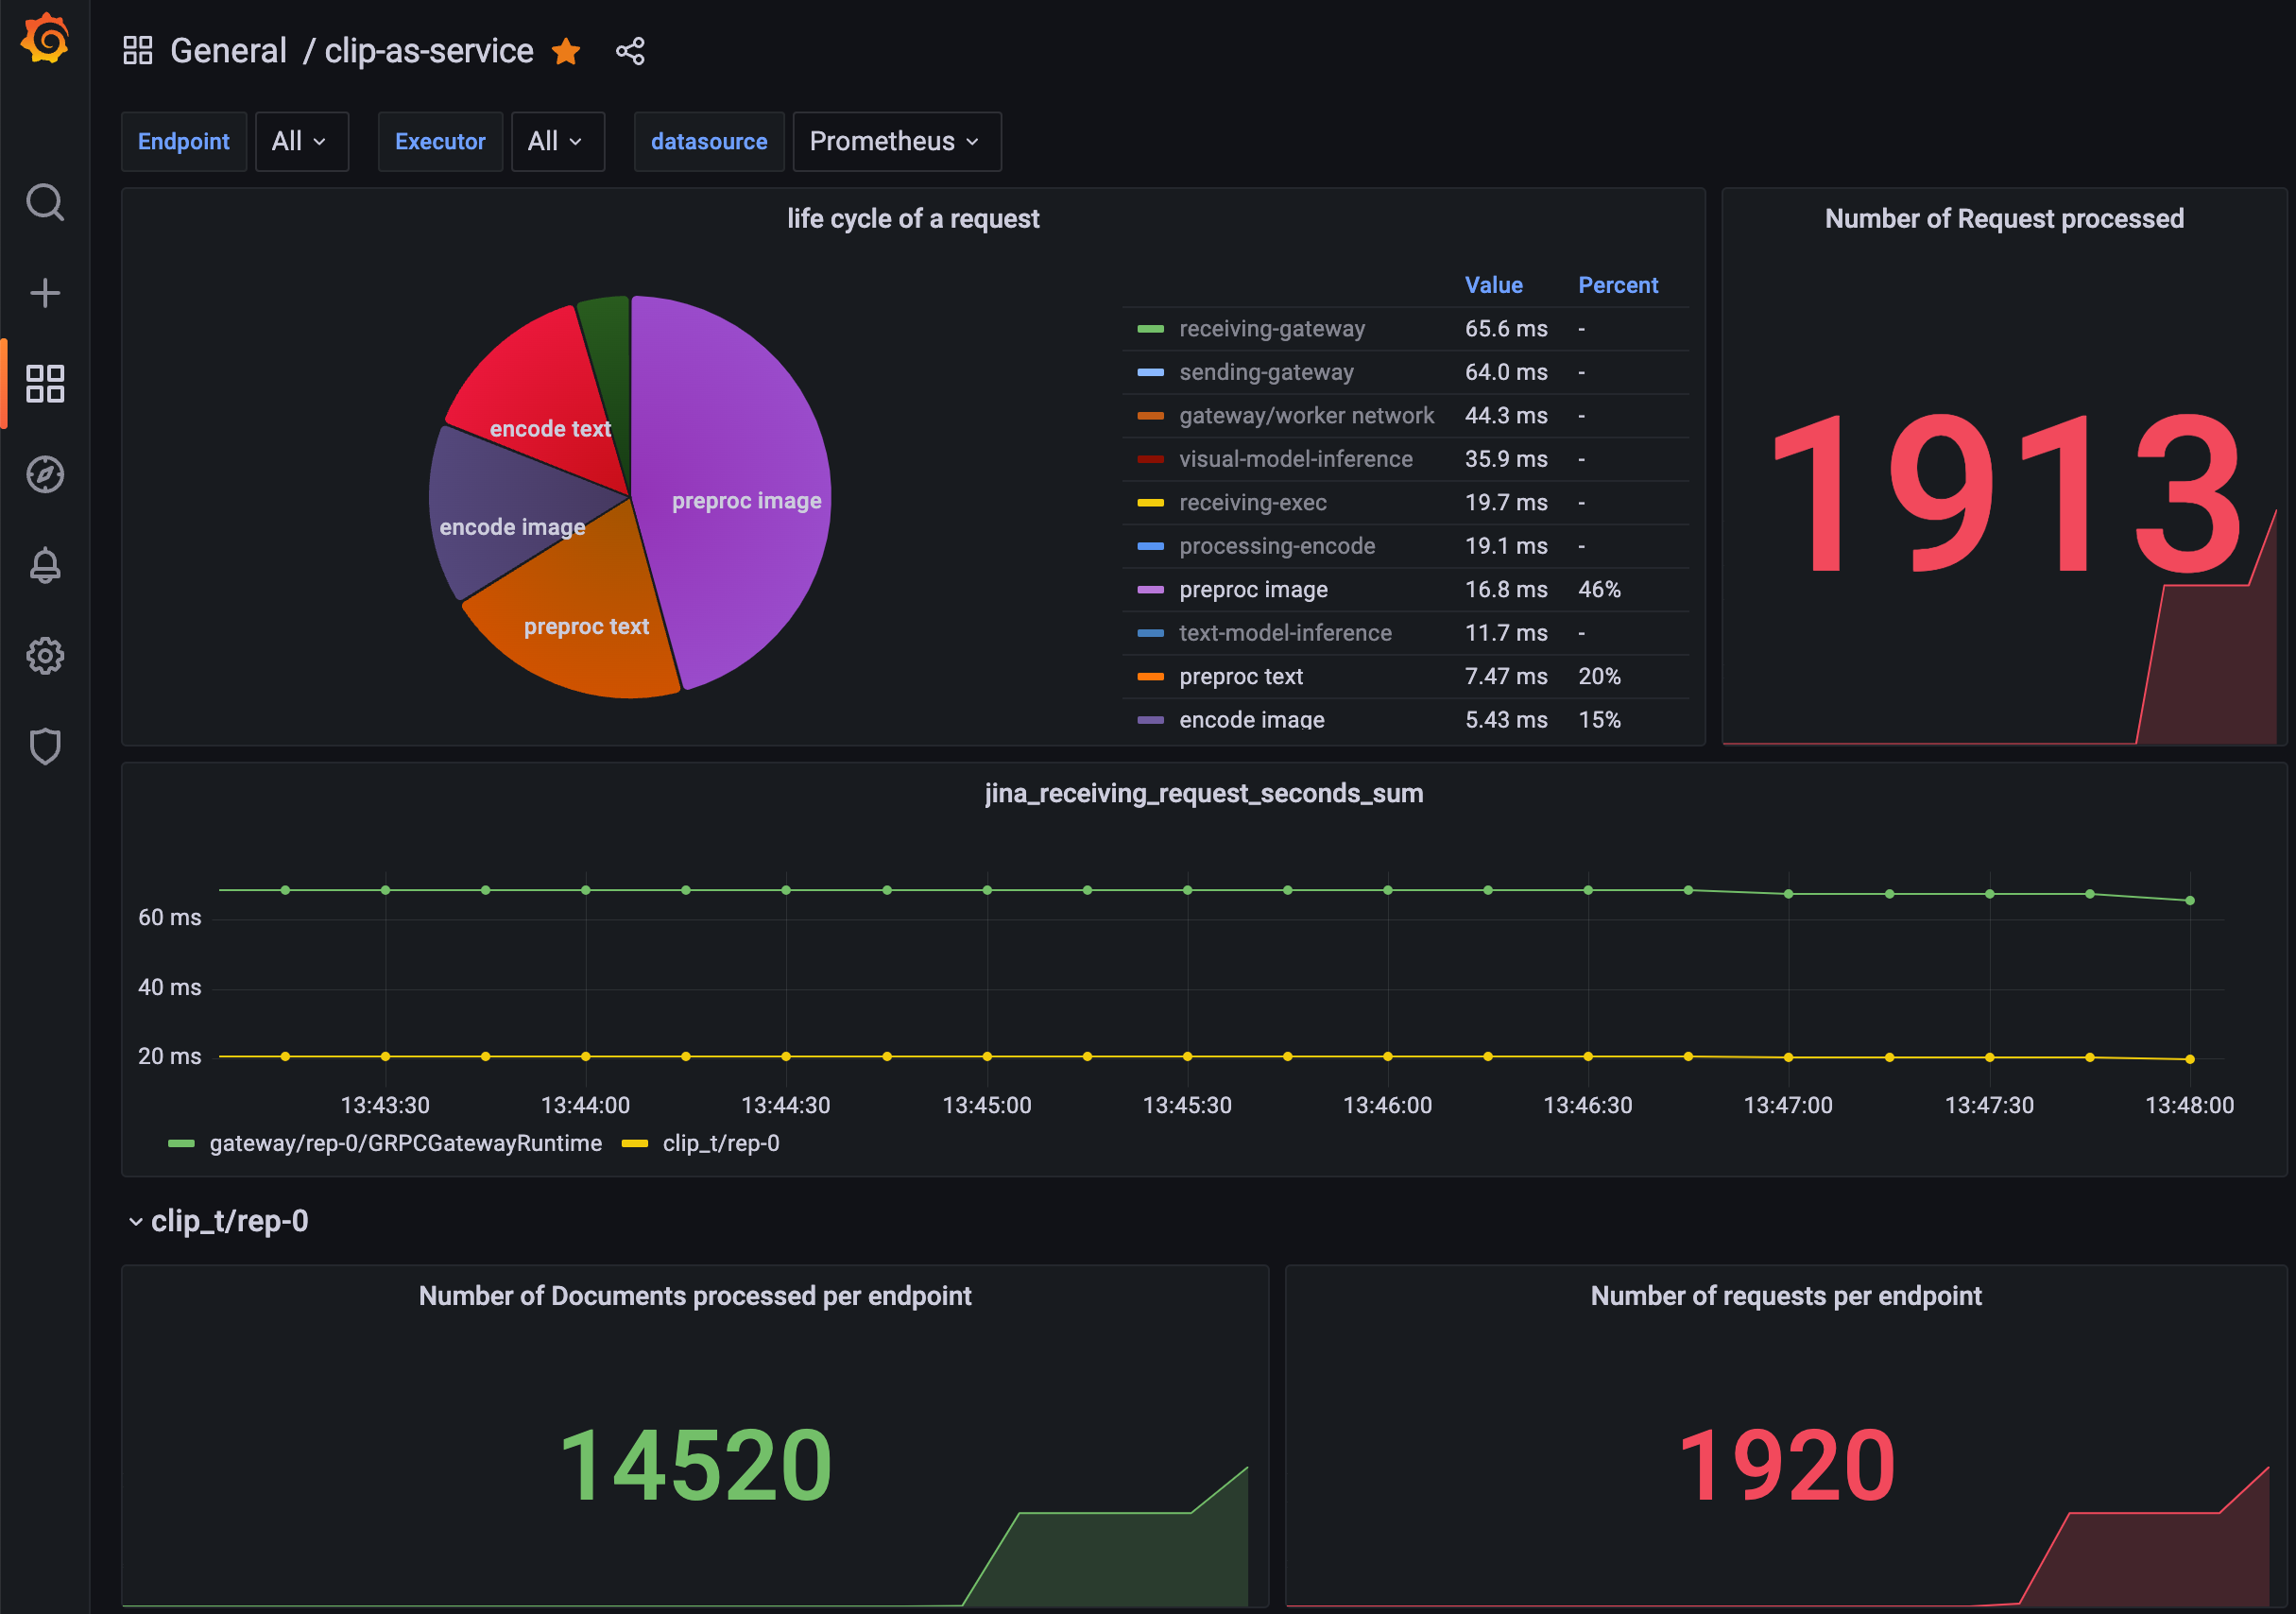
For more information on monitoring a Flow, please read here.
Serve with TLS#
You can turn on TLS for HTTP and gRPC protocols. Your Flow YAML should be changed to the following:
jtype: Flow
version: '1'
with:
  port: 8443
  protocol: http
  cors: true
  uvicorn_kwargs:
    ssl_keyfile_password: blahblah
  ssl_certfile: cert.pem
  ssl_keyfile: key.pem
Here, protocol can be either http or grpc; cert.pem or key.pem represent both parts of a certificate, key being the private key to the certificate and crt being the signed certificate. You can run the following command in terminal:
openssl req -newkey rsa:4096 -nodes -sha512 -x509 -days 3650 -nodes -out cert.pem -keyout key.pem -subj "/CN=<your.clip.address>"
Note that if you are using protocol: grpc then /CN=<your.clip.address> must strictly follow the IP address or the domain name of your server. Mismatch IP or domain name would throw an exception.
Certificate and keys can be also generated via letsencrypt.org, which is a free SSL provider.
Warning
Note that note every port support HTTPS. Commonly support ports are: 443, 2053, 2083, 2087, 2096, 8443.
Warning
If you are using Cloudflare proxied DNS, please be aware:
you need to turn on gRPC support manually, please follow the guide here;
the free tier of Cloudflare has 100s hard limit on the timeout, meaning sending big batch to a CPU server may throw 524 to the client-side.
When the server is successfully running, you can connect to it via client by setting server to https:// or grpcs:// as follows:
from clip_client import Client

c = Client('grpcs://<your.clip.address>:2096')

r = c.encode(
    [
        'First do it',
        'then do it right',
        'then do it better',
        'https://picsum.photos/200',
    ]
)
Serve in Docker Container#
You can run the server inside a Docker container. We provide a Dockerfile in the repository, which is CUDA-enabled with optimized package installation.
Build#
We have a list of pre-built images available on Docker Hub. If they are too big for you to download, you may consider built it yourself as follows:
git clone https://github.com/jina-ai/clip-as-service.git
docker build . -f Dockerfiles/server.Dockerfile  --build-arg GROUP_ID=$(id -g ${USER}) --build-arg USER_ID=$(id -u ${USER}) -t jinaai/clip-server
Tip
The build argument --build-arg GROUP_ID=$(id -g ${USER}) --build-arg USER_ID=$(id -u ${USER}) is optional, but having them is highly recommended as it allows you to reuse host’s cache with the correct access.
Run#
docker run -p 51009:51000 -v $HOME/.cache:/home/cas/.cache --gpus all jinaai/clip-server
docker run -p 51009:51000 -v $HOME/.cache:/home/cas/.cache --gpus all jinaai/clip-server:master-onnx onnx-flow.yml
docker run -p 51009:51000 -v $HOME/.cache:/home/cas/.cache --gpus all jinaai/clip-server:master-tensorrt tensorrt-flow.yml
Here, 51009 is the public port on the host and 51000 is the in-container port defined inside YAML. The argument -v $HOME/.cache:/home/cas/.cache leverages host’s cache and prevents you to download the same model next time on start.
Due to the limitation of the terminal inside Docker container, you will not see the classic Jina progress bar on start. Instead, you will face a few minutes awkward silent while model downloading and then see “Flow is ready to serve” dialog.
To pass a YAML config from the host, one can do:
cat my.yml | docker run -i -p 51009:51000 -v $HOME/.cache:/home/cas/.cache --gpus all jinaai/clip-server -i
cat my.yml | docker run -i -p 51009:51000 -v $HOME/.cache:/home/cas/.cache --gpus all jinaai/clip-server:master-onnx -i
cat my.yml | docker run -i -p 51009:51000 -v $HOME/.cache:/home/cas/.cache --gpus all jinaai/clip-server:master-tensorrt -i
The CLI usage is the same as described here.
Tip
You can enable debug logging via: docker run --env JINA_LOG_LEVEL=debug ...
Pre-built images#
We have prebuilt images with CUDA support.
The Docker image name always starts with jinaai/clip-server followed by a tag composed of three parts:
jinaai/clip-server:{version}{extra}
{version}: The version of Jina. Possible values:latest: the last release;master: the master branch ofjina-ai/jinarepository;x.y.z: the release of a particular version;x.yandx: the alias to the lastx.y.zpatch release, i.e.x.y=x.y.max(z);
{extra}: the extra dependency installed along withclip_server. Possible values:-onnx: ONNX backend;-tensorrt: TensorRT backend;
Image alias and updates#
Event |
Updated images |
Aliases |
|---|---|---|
On merge into |
|
|
On |
|
|
3 images are built on the event listed above, i.e. taking the combination of:
{extra} = ["", "-onnx", "-tensorrt"]
Image size on different tags#
Warning
Due to a known bug in shields.io/Docker Hub API, the following badge may show “invalid” status randomly.
Image Size |
|---|


